Add your first client
Create a client, assign staff, decide how data gets in.
A client in Kiravy = one SME whose books you keep. This page walks through creating one and choosing how its data lands in Kiravy.
Create the client
Option A — During the onboarding wizard
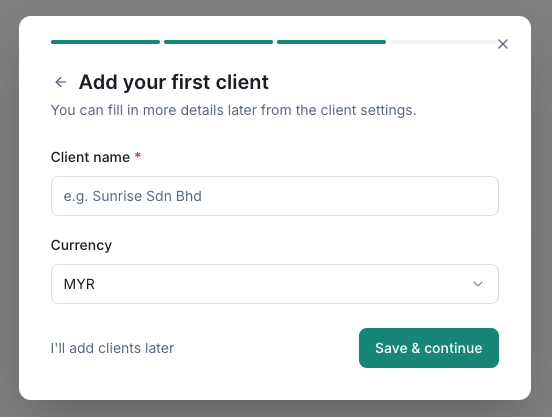
When you sign up and log in for the first time, the wizard's Step 3 lets you add a client right there: enter the name and currency, hit Save & continue, and you're done.
Option B — From the Clients page
At any time:
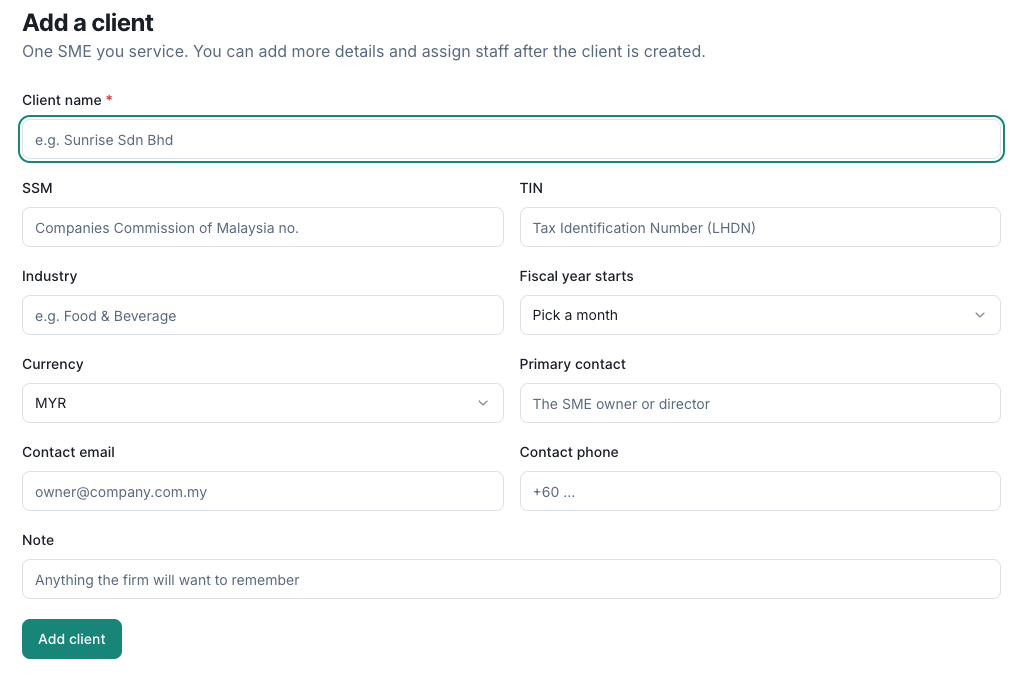
- Clients in the sidebar → Add client
- Required fields:
- Name (e.g. Mamak Pelita Sdn Bhd)
- Optional fields you should fill in for completeness:
- SSM — the Suruhanjaya Syarikat Malaysia registration number. Used as a stable identifier and shows up next to the name as a badge.
- Industry — free text, but try to be consistent (helps with future benchmarks)
- BRN / TIN — fill in manually
- Currency — defaults to MYR; can be changed per client
- Save
You'll land on the client workspace — a familiar tab layout (Transactions, Customers, Suppliers, AR, AP, Receipts, Documents, Engagements, AI, Reports, Settings) all initially empty.
Assign your team
Only relevant if you have Staff or Viewer members — Partners and Managers see all clients automatically.
- Client → Settings → Team → Add assignment
- Pick the member → save
See Set up your firm → Assigning staff for the longer version.
Pick how data gets in
Three paths into Kiravy. Mix and match — receipts, manual entry, and CSV imports can all run alongside each other.
Option A — Receipts (OCR upload)
For receipts and bills you have as photos / PDFs. Upload, Kiravy's AI extracts the fields (vendor, date, total, SST), you review, hit Save — it lands as a transaction.
Full guide: Receipts (OCR).
Option B — Manual entry
Type transactions in directly. Good for one-off journals, opening balances, or testing.
Full guide: Transactions.
Chart of Accounts
By default a starter set of CoA codes is created automatically when a client is added — covering common SME P&L codes. You can:
- Use the default seed CoA as-is
- Edit it from Settings → Chart of Accounts: add codes, change types, deactivate ones you don't need
See How Kiravy thinks about Chart of Accounts for the design rationale.
A few useful settings to know about
| Setting | Where | What it does |
|---|---|---|
| SST rate | Client → Settings → SST | Default rate for new SST-applicable transactions (6 % or 8 %) |
| Currency | Client → Settings → Profile | Per-client base currency; defaults to MYR |
| Engagement template | Client → Engagements | Default checklist used when you start a month-end close |
Archiving a client
When a client engagement ends, don't delete — archive instead. Archived clients vanish from the default list but the data stays for 7 years (FRD compliance). Restore from Clients → All → switch to Archived filter → open client → Restore.
See Archive & delete for the gritty details.
What's next
- Receipts (OCR) — fastest way to get existing paper bills into Kiravy
- Transactions — manual entry and CSV import
- How Chart of Accounts works — read this once, you'll thank yourself